イントロダクション
この記事で得られる事
- RaspberryPiのIPを固定する方法がわかる。
作業環境
- 作業PC
- OS: macOS
- version: High Sierra
- OS: macOS
- Raspberry Pi
- model: Raspberry Pi model B
- OS: Raspbian GNU/Linux 9
- ルーター(兼、モデム)
- NTT PK-500KI
作業の流れ
- 現在のネットワーク環境を確認する
- 固定IPの設定をする
- 設定を反映
何故IPを固定にするのか?
どんな端末でも、ネットワークにつなげる以上はIPが必要になります。
そのIPを管理するのがDHCPサーバーです。
メリット
私が使用してるルーターには、DHCPサーバーの機能が内蔵されています。
DHCPサーバーが機能している事で、次のような事が自動的にできます。
- 接続するデバイス毎にIPを割り当てて
- 一定期間使用していない(接続されていない)IPを再利用する
もちろん、DHCPサーバーでもIPを固定する事も可能です。
しかし、短期間で大量に接続する必要な状況になった時、再利用していかないと使えるIPが枯渇してしまいます。
デメリット
再利用する過程の中で、IPの変更が発生します。
IPが変更されてしまうと、毎回接続情報が変わってしまうので、その度に設定を変えなければ行けなくなります。
例えば…
停電でDHCPサーバーが落ちてしまったとします。
復帰したとしても、DHCPサーバーで一定時間使用されていないとなった場合、IPの管理情報は無くなってしまいます。
そうなると、早い順にIPが割り当てられるので、元のIPでは無くなる可能性があります。
今回の対策の趣旨
DHCPサーバーに接続情報の保持期間を延長してもらうことも出来ます。
今回は、RaspberryPiから、DHCPサーバーに延長申請を出す事が目的になります。
DHCPサーバーについて参考になるページ
現在のネットワーク環境を確認する
ルーター(DHCPサーバー)の情報を調べる
このルーターのIPは192.168.1.1です。
他の会社のルーターの場合でも、説明書やネットワーク設定の資料に記載されているかと思います。
http://192.168.1.1にアクセスします。
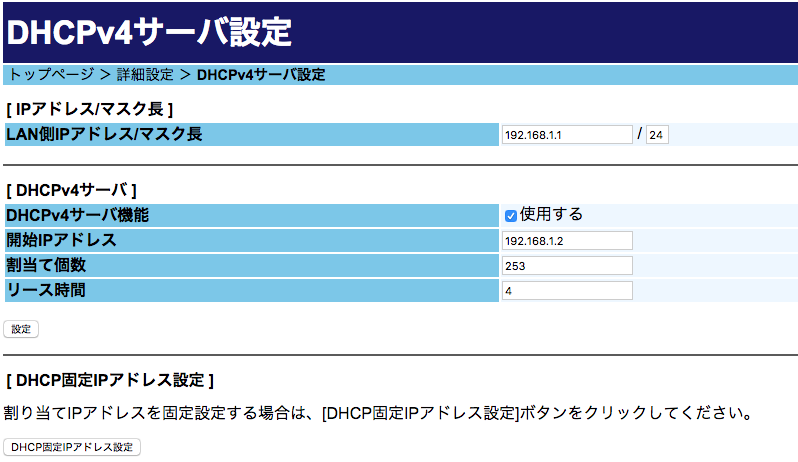
サイドメニューから、「詳細設定」->「DHCPv4サーバ設定」を開きます。

上記の情報から、次の事がわかります。
- ルーターのIP:192.168.1.1
- サブネットマスク:24
- 割り当て出来るIPの領域:192.168.1.2~192.168.1.255
- リース時間:4時間
RaspberryPiのネットワーク環境を確認する
現在、RaspberryPi(以下、RPi)がどのようなネットワーク環境になっているかを確認します。
まず、RPiにSSH接続します。
その後、ifconfigで現在のネットワークインターフェースを確認します。
$ ifconfig
eth0: flags=4163<UP,BROADCAST,RUNNING,MULTICAST>  mtu 1500
        inet 192.168.1.9  netmask 255.255.255.0  broadcast 192.168.1.255
        inet6 fe80::d02c:c78f:9659:40eb  prefixlen 64  scopeid 0x20<link>
        inet6 2404:7a83:4720:3900:9edd:f89d:ab7e:ff18  prefixlen 64  scopeid 0x0<global>
        ether b8:27:eb:cf:67:42  txqueuelen 1000  (イーサネット)
        RX packets 88817  bytes 117539988 (112.0 MiB)
        RX errors 0  dropped 29  overruns 0  frame 0
        TX packets 28840  bytes 3227697 (3.0 MiB)
        TX errors 0  dropped 0 overruns 0  carrier 0  collisions 0

lo: flags=73<UP,LOOPBACK,RUNNING>  mtu 65536
        inet 127.0.0.1  netmask 255.0.0.0
        inet6 ::1  prefixlen 128  scopeid 0x10<host>
        loop  txqueuelen 1  (ローカルループバック)
        RX packets 0  bytes 0 (0.0 B)
        RX errors 0  dropped 0  overruns 0  frame 0
        TX packets 0  bytes 0 (0.0 B)
        TX errors 0  dropped 0 overruns 0  carrier 0  collisions 0
ちなみに、ifconfigのifはインターフェースの略です。
この情報から、eth0とloというインターフェースが存在するのがわかります。
eth0というのは「イーサーネット」の略なので、有線LANでの接続が存在しているという事になります。
loは「ローカルループバック」の略で、実態のない仮想のネットワークが存在しているという事になります。
開発では馴染みがある、「localhost」がこれにあたります。
eth0のインターフェースから、IPを固定するために必要な情報を取得します。
- 現在の割り当てられているIP:
192.168.1.9 - インターフェース:eth0
現在割り当てられているIPをそのまま生かしたいので、固定するIPは192.168.1.9にします。
固定IPの設定をする。
Debianのネットワークの設定は、/etc/network/interfacesを変更します。
しかし、現行のRasbian、上記ファイルを開くと次のような情報が得られます。
/etc/network/interfaces
# interfaces(5) file used by ifup(8) and ifdown(8)

# Please note that this file is written to be used with dhcpcd
# For static IP, consult /etc/dhcpcd.conf and 'man dhcpcd.conf'

# Include files from /etc/network/interfaces.d:
source-directory /etc/network/interfaces.d
設定ファイルには下記と書かれています。
Please note that this file is written to be used with dhcpcd For static IP, consult /etc/dhcpcd.conf and 'man dhcpcd.conf'
Rasbianの場合は、dhcpcd.confを直接書き換える必要があります。
dhcpcdは、DHCPクライアントを建てるために使います。
RPiの中にDHCPクライアントを建てることで、DHCPサーバー(ルーター)に対して延長申請が出せるようになります。
dhcpcd.confには、申請内容を設定する事になります。
次に、dhcpcd.confのマニュアルを確認します。
マニュアルの中で、固定IPの設定方法には次のように書かれています。
$ man dhcpcd.conf
...
static value
        Configures a static value.  If you set ip_address then dhcpcd will not attempt to obtain a lease and just use the
        value for the address with an infinite lease time.  If you set ip6_address, dhcpcd will continue auto-configuation as
        normal.

        Here is an example which configures two static address, an IPv4 router, DNS and disables IPv6 auto-configuration.  You
        could also use the inform6 command here if you wished to obtain more information via DHCPv6.  For IPv4, you should use
        the inform ipaddress option instead of setting a static address.
              interface eth0
              noipv6rs
              static ip_address=192.168.0.10/24
              static ip6_address=fd51:42f8:caae:d92e::ff/64
              static routers=192.168.0.1
              static domain_name_servers=192.168.0.1 fd51:42f8:caae:d92e::1

        Here is an example for PPP which gives the destination a default route.  It uses the special destination keyword to
        insert the destination address into the value.
              interface ppp0
              static ip_address=
              destination routers
設定方法を参考に、次のように設定します。
/etc/dhcpcd.conf
interface eth0
static ip_address=192.168.1.9/24
static routers=192.168.1.1
static domain_name_servers=192.168.1.1
- interface:
eth0を入力。 - ip_address:固定したいIPとサブネットマスクを入力
- routers:ルーターのIPを設定。
- domain_name_servers:特定のネームサーバーを経由したいわけではないため、
cat /etc/resolv.confで確認したIPを入れておきます。
設定を反映
RPiを再起動します。
$ sudo reboot
Tips
DNSに設定する8.8.8.8とは?
ネットで得られる情報の中に、dhcpcd.confの設定で、DNSに8.8.8.8を入れている記事を見かけます。
このIPは、Googleが運用しているDNSサービスです。
developers.google.com
実際に利用した事はないですが、サイトの参照速度が上がるという情報が多く見つかります。
ルーターのBasic認証がわからない…
初めてネットワーク設定した時に、自分で設定をしているはずです。
ユーザー名は、userで固定のようなので、設定したと思われるパスワードを試してみてください。